Nginx Reverse Proxy
Getting Started
Firstly we need to make sure we have docker and docker-compose installed and setup.
Once the has been done we need to set up the docker-compose.yml file for nginx. We can get the docker-compose.yml file from Nginx Proxy Manager or copy the following docker-compose.yml file
1
2
3
4
5
6
7
8
9
10
11
12
version: '3.8'
services:
  app:
    image: 'jc21/nginx-proxy-manager:latest'
    restart: unless-stopped
    ports:
      - '80:80'
      - '81:81'
      - '443:443'
    volumes:
      - ./data:/data
      - ./letsencrypt:/etc/letsencrypt
Once we have this made, make changed to the ports if needed.
Port Forwarding
Before we go any further we need to make sure that we are fowarding ports 80 and 443 to the ports that you have set in the docker compose file.
This can be done by looking up the name of your router and look up port fowarding ports 80 and 443 for your router.
Cloudflare setup
In this guide we use Cloudflare for our ssl creation. We will need to get our API key for Zone editing. We need this so that Nginx can create ssl certificates for our websites and hosts we want to forward out to the wider web.
This can be done by logging into your Cloudflare Dashboard. Once we have logged in we go to Account, then API key. We can then create our API key using the Edit Zone templete. When we have our API key we need to keep this one side as Cloudflare doesn’t let you look at these API keys once they have been made.
The second step we need to do is create a DNS record for the service we want to forward out. We will set the subname for the DNS record and in the ip we will set it to our Public IP, you can get this by typing into Google “Whats my ip”. Once you type this Google will give you what your current public ip is.
Extra setup
We need to make sure that in our SSL/TLS tab we have our encryption mode set to full or full (strict), along with going to “Edge Certificates” and making sure we have “Always Use HTTPS” set to true. Once that is done we can go to our Nginx Setup
Nginx Setup
Now that we have done all of this we can finnaly go to Nginx🎉. You can get to Nginx by typing in the IP of the device you are hosting Nginx from along with the prot 81 at the end. For example http://192.168.1.50:81. This will then take you to the Nginix Proxy Manager website where you will fill in the default login details which should be:
- admin@example.com
- changeme
Once you have filled that in and press login you will be asked to change the details for the main Admin account.
SSL Certificates
Now that we have gained access to our Nginx instance we need to add our own SSL Cert. We do this by going to the SSL Certificates tab. This will take you to where you can fill in details for your SSL Cert. We will press on “Add SSL Certificate”, then press “Let’s Encrypt” and it will bring up a form for us that we need to fill in. It should look like this:C
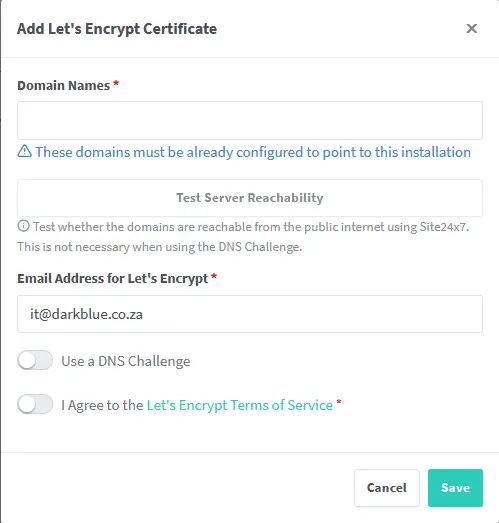
In here we need to fill in the domain names we wish to create a certificate for. What you can do is peg this SSL cert to one domain name or make a wildcard cert. In most cases creating a wildcard cert is easier to do and more effective. To create a wildcard cert we need to type in our domain name like so *.example.com. We will then select DNS Challenge, this will then give us a dropdown for DNS Provider. In here we will look for Cloudflare and select this. You should see something like this 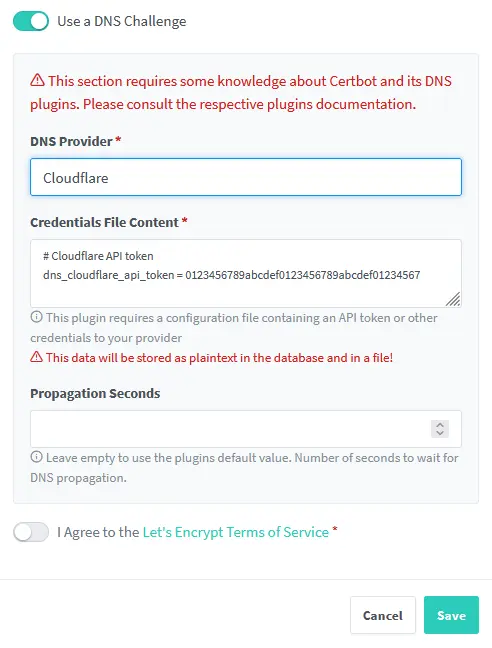
Here is wherer we will take that API key we wrote down ealier and fill it in.
Once all of this has been done you will see that you now have yourself your own SSL cert.
We can now go onto the next step and that is creating our hosts.
Hosts
So to create a proxy host we need to press on the Hosts button in the nav bar. This will give us a dropdown in which we will press Proxy Hosts. You should then see a new blank page with the only notable things showing is “Add Proxy Host”.
We will press “Add Proxy Host” and this will give us a new form for us to fill in. We will go about everything the same way as before just this time for the domain name you will want to type the name of the service you want to forward, for example plex.example.com.
We will then type the IP of the machine that is hosting the service we will host. Once we have put the IP in we will need to put the port in. You can then tick “Block Common Exploits” and then move onto the SSL tab.
Here you will select the SSL cert you just made and make sure to press Force SSL. This will make sure that your service will always use HTTPS.
Once this has been done you should be set, go to the domain name you just typed in and boom you are now hosting your service out to the internet with your own certs.